Not so Superbox
I have received a Turkcell Superbox from my ISP a while ago. It’s a rebranded ZTE MF286R. I am a tin foil hat wearer and it’s a nightmare fuel for me to have a black box residing in my network which runs proprietary software and frequently phones home. Most of wireless routers are like this and my ISP provided router is not an exception.
It’s not a good aspect of the device to find out that there’s no chance to reflash its’ firmware with some free alternatives like OpenWrt or DD-WRT, yet. So I decided to fiddle with it to see if I can adjust a thing or two in order to mitigate the possible unwanted behaviors.
Then it came to my attention that this device can send and receive SMS. I think it might be useful for smart home applications so I would not have to use another platform to maintain for sending sensor information, power outage (yes, it has a battery input!), and whatnot.
Precautionary Measures
Please do not blame me if you blow up your precious device. Proceed only if you know what you are doing. I do not want to imply that I know what I am doing but, whatever… I know this blog is already starting to sound like a bad custom ROM thread from XDA Forums but I cannot help it.
I’m concerned if my intervention somehow gets evaluated as abuse of service, so it may (or may not) be a wise decision to minimize the vectors for remote control.
There are some extra menus and options hidden from user. Fortunately they are hidden using client side methods. I will talk about a few of them but you can find more by searching for isRootUser and display: none with Inspector tool.
There is a page where it’s possible to import and export device configuration. In case we mess up the settings, we may restore the device back to a working state.
1. Export Device Settings
Because I have found its’ URL, you don’t have to. You can directly navigate to the related page from http://192.168.1.1/index.html#configuragtion [sic]. But if you are ascetic you can follow the next steps to find it yourself.
Go to Advanced Settings > Others
Open the Developer Tools of your browser, switch to the Inspector tab and search for
isRootUserand remove the inline CSS style (style="display: none;") of second occurence.
- Inspector view for Backup & Restore element
Now you should see the Backup & Restore link. Enter it.
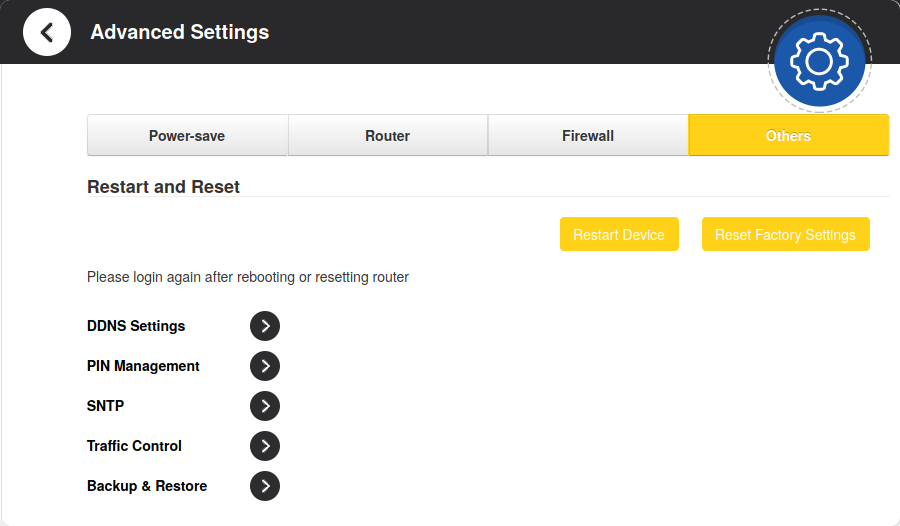
- Visible Backup & Restore link
Now press the yellow Export button and it will prompt you to save a file named CPE_settings.dat. Save it. I hope we will never need it…
2. Disable TR-069
TR-069 is a protocol that’s used for remote management of customer devices. It’s actually a great tool and not inherently evil. But I cannot trust my ISP so I disable it. By disabling it, I know that I will lose access to some cool features in customer portal of the ISP website. This may also cause some headache when you face a network problem and call your ISP because they use it to diagnose the problem. You’re on your own.
TR-069 is at http://192.168.1.1/index.html#tr069config. But if you want to make it visible yourself, it’s listed on the same page with Backup & Restore. Follow the same steps in previous headline but remove the inline CSS style from first occurence instead of second. Then enter it.

- Preview of TR069Config page
Disable Periodic Inform.
Note down the default values just in case and then replace Server Username and Connection Request Username with something invalid.
Apply changes.
3. Disable Remote Management
I have seen an option named Remote Management in Advanced Settings > System Security path. It’s invisible by default but it’s easy to make it visible. If Remote Management is enabled, an IP Address input becomes available and it’s default value is 85.29.0.0/18;85.29.13.0/27;. Apparently 85.29.0.0 range belongs to TELLCOM, which is a subsidiary of Turkcell Superonline. We better disable it. But how?
Navigate to the System Security: http://192.168.1.1/index.html#system_security

- This is default preview of the page
Repeat the instructions on the second step of Export Device Settings, search for
isRootUserbut this time remove the inline CSS style of first occurence.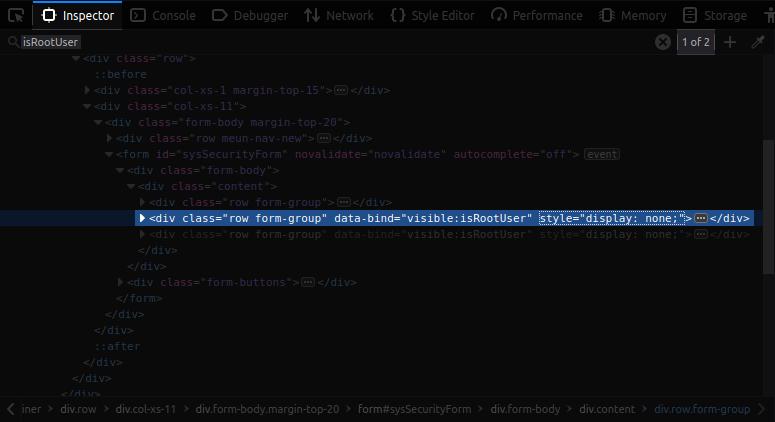
- Inspector view for Remote Management element
If it is enabled, disable it and Apply changes.

- Remote Management option became visible
The Script
I’ve automated the login-and-fetch process with a simple shell script. Here’s the summary of what this script does:
- Obtain required parameters
- Compose necessary hash for login request
- Send a POST request to login
- Verify login
- Use login cookie to fetch SMSes
- Print them
How Does It Work
I will try to explain the flow of the script but before that, I want to speak a little about my environment. I’m using Ubuntu 18.04 and the script utilizes cURL, jq and some other basic tools. I use jq to filter out JSON data from the response of cURL.
To install the dependencies: apt install jq curl perl
URL Templates
At the top of the main() function, 49th line, there are 2 URL string we will use frequently. URL_GET_CMD is used on GET requests and URL_SET_CMD is used on POST requests. isTest=false and request time in epoch format were also taking place in requests so I cargo-culted to minimize the amount of surprises.
URL_GET_CMD="http://$ROUTER_IP/goform/goform_get_cmd_process?isTest=false&_=$(epoch)"
URL_SET_CMD="http://$ROUTER_IP/goform/goform_set_cmd_process"
Retrieving Parameters
On line 14, there is get_cmd function.
get_cmd() {
    curl -s -H "$HEADER_REF" "$URL_GET_CMD&cmd=$1" \
        | jq -r ".$1"
}
I’ve basically tried to imitate the following GET request with bare minimum parameters.
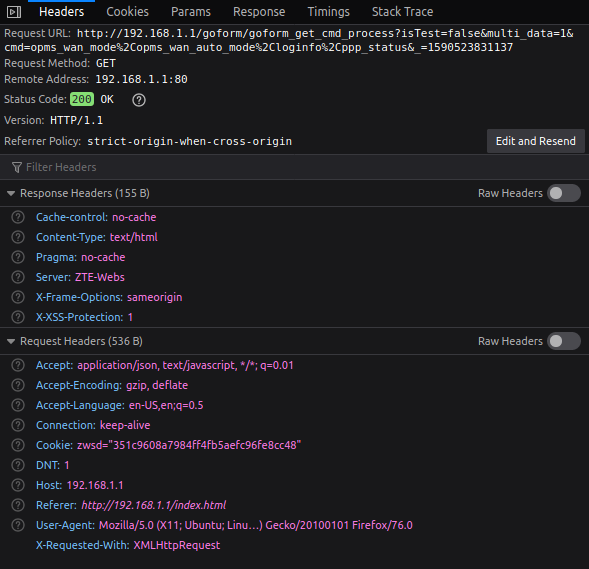
In turn, you receive a JSON response like below.
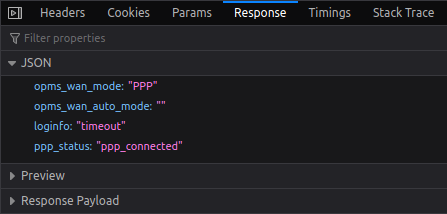
I could not find an elegant way to request multiple parameters then parse them at a time so I’ve limited my get_cmd to a single argument. After that pipe cURL output to jq with -r switch to get the raw data without double quotes and store it in a variable.
Sending a Login Request
We have a sample login request here.
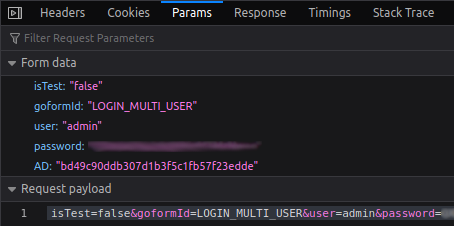
There were two different unknown values. First one was easy to demystify: password. The value you enter in the password field of login form was Base64 encoded. That’s all. The second one, AD was slightly harder. It was obviously looking like an MD5 but what input is passed to the MD5 function?
Before the login request, client (your PC) sends a GET request asking for a value named RD. Then uses two different values, namely rd0 and rd1. I have tried to understand their meaning and after a debug period, I have seen that their names mean wa_inner_version and cr_version respectively in line 316 of (pretty printed) service.js. I guess cr_version is customer version and wa_inner_version is probably internal naming of the firmware.
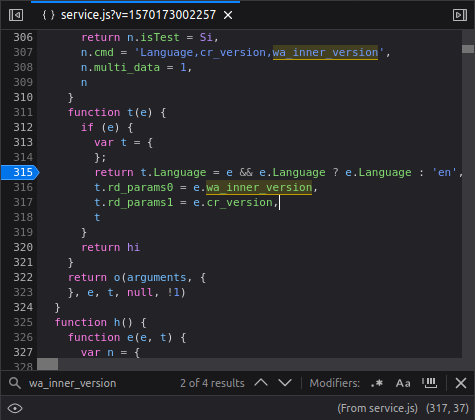
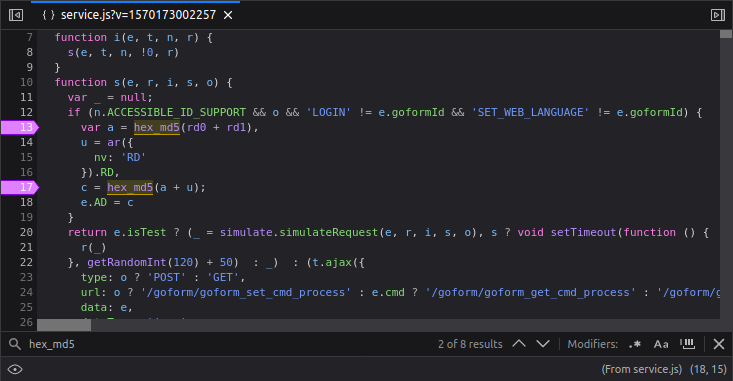
Finally, this is how AD is forged. JS source was partially obfuscated so it was a bit of an hassle to locate the clues. It works like that: md5(md5(rd0 + rd1) + RD).
From line 54 to line 68 in the script, we calculate AD.
# get RD
RD=$(get_cmd "RD")
# get rd0 a.k.a. rd_params0 a.k.a. wa_inner_version
rd0=$(get_cmd "wa_inner_version")
# get rd1 a.k.a. rd_params1 a.k.a. cr_version
rd1=$(get_cmd "cr_version")
# compose AD with following formula: AD = md5(md5(rd0+rd1)+RD)

MD5_rd=$(echo -n "$rd0$rd1" \
    | md5sum \
    | awk '{print $1}')

AD=$(echo -n "$MD5_rd$RD" \
    | md5sum \
    | awk '{print $1}')
The actual login request takes place on line 76
LOGIN_RESULT=$(curl -s -c "$PATH_COOKIE_FILE" -H "$HEADER_REF" -H "$HEADER_CONTENT_TYPE" -d "$LOGIN_PARAMS" "$URL_SET_CMD" | jq -r ".result")
Append user ID, Base64 encoded password and AD to the $LOGIN_PARAMS, set Content-Type as application/x-www-form-urlencoded and send a POST request. If response is 0 it means success. We also receive a cookie named zwsd on a sucessful login response, which will be used on further requests.
Fetching Messages
We have successfully logged in to the UI. So far so good. Now it’s time to do the actual work. I chose the task of reading the list of SMS from the device.
Client side sends a GET request with some basic pagination parameters and includes zwsd cookie, obtained on the previous paragraph, in response header. This is how I accomplish this, as seen on line 112.
QUERY_SMS="sms_data_total&page=0&data_per_page=500&mem_store=1&tags=10&order_by=order+by+id+desc"
MSG_RESPONSE="$(curl -s -H "$HEADER_REF" -H "$COOKIE_PARAM" "$URL_GET_CMD&cmd=$QUERY_SMS")"
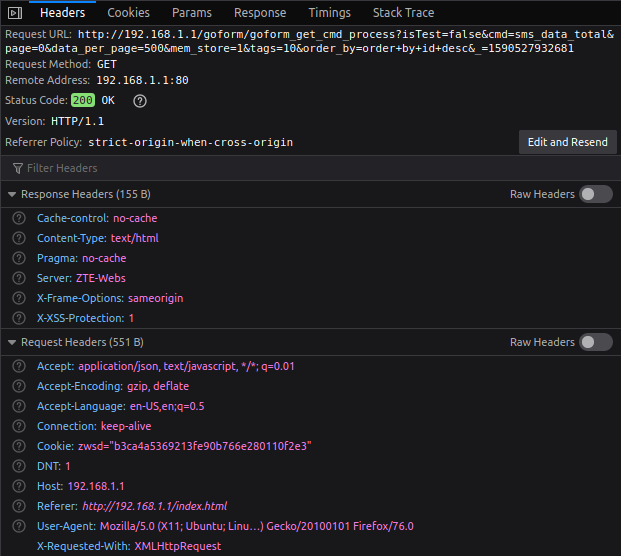
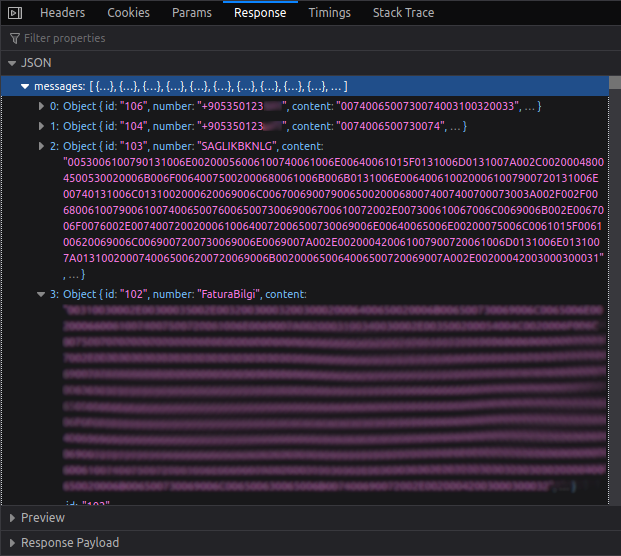
There we see the response. It includes phone number, send/receive time in a custom format, and message content as hex encoded UTF-8, and some other different values.
There’s a sketchy demonstration of the print process.
# Some contacts include "space" in their name. If we do not ignore "space",
# it would be split apart into multiple lines.
IFS=$'\n'
for msg in $(echo "$MSG_RESPONSE" | jq -c '.messages | .[]'); do
    # echo "$msg"
    MSG_ID="$(echo "$msg" | jq -r '.id')"
    MSG_NUMBER="$(echo "$msg" | jq -r '.number')"
    MSG_DATE_RAW="$(echo "$msg" | jq -r '.date')"
    MSG_TEXT_RAW="$(echo "$msg" | jq -r '.content')"
    MSG_DATE=$(parse_date "$MSG_DATE_RAW")
    MSG_TEXT=$(hex_to_utf8 "$MSG_TEXT_RAW")
    printf "[%3d] %s | %s\n" "$MSG_ID" "$MSG_NUMBER" "$MSG_DATE"
    echo "- - - - - - - - - - - - - - - - - - - - - - -"
    echo "$MSG_TEXT"
    # echo "$MSG_TEXT_RAW"
    # echo "$MSG_TEXT_RAW" | xxd -ps -r
    printf "\n"
done
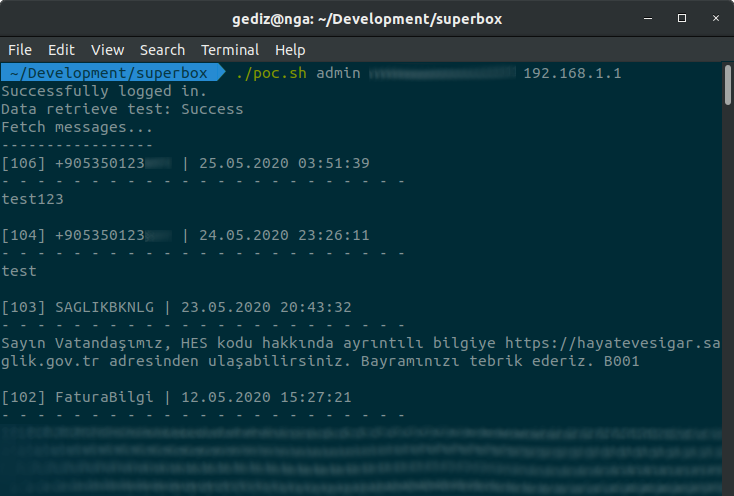
… and its’ output:
That’s All
It was a fun journey for me. I am planning to create a script which makes it possible to send an SMS for the next chapter.
Please send an email to gedizaydindogmus[at]gmail.com if you see something wrong, notice a typo, or just to say hello!